Create and manage condition sequences
Learn how to manage condition sequences for transient engine mission simulations. You will inspect, modify, export, and import condition sequences and associate them with simulation solutions.
Introduction
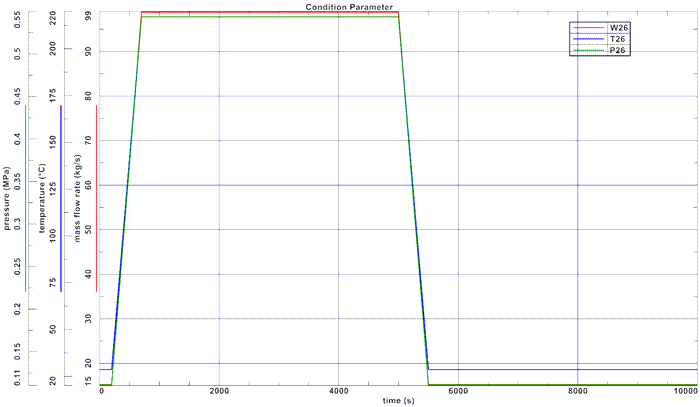
Condition sequences are used to define the transient operation of a gas turbine such as cycle definition by combining time steps with corresponding operating conditions.
A condition represents a specific engine operating state—such as 50% or 100% power—and includes parameters such as temperatures, pressures, mass flows, shaft speeds, and other engine data at defined locations. By assembling conditions over time, you create an engine operating profile that can be used for clearance evaluations and durability analyses, including stress calculations.
In this tutorial, you will manage condition sequences within the simulation, and learn how to export and import them for reuse across models and analyses.
Define assembly load options
Configure search folders to load a model whose part and FEM files are stored in multiple directories.
-
On the Home tab, click Assembly Load
Options
 .
.
Inspect condition sequences
Review time steps, conditions, and parameters defined in a mission profile.
-
Choose
 .
.
-
On the Parameters tab, you can add new parameters
with assigned units by clicking Add new Parameter
 .
Note that after adding a parameter, you must update its value for each condition under the Conditions tab.
.
Note that after adding a parameter, you must update its value for each condition under the Conditions tab. -
Right-click the selection and choose Plot XY.
Create and associate a new condition sequence
Duplicate and modify a mission profile, then create a new solution from the updated sequence.
Export and import condition sequences
Export condition sequences to external formats, modify the XML file, and reimport it as a new mission.
-
Choose
.
-
Modify the exported XML file to define a new mission as shown.
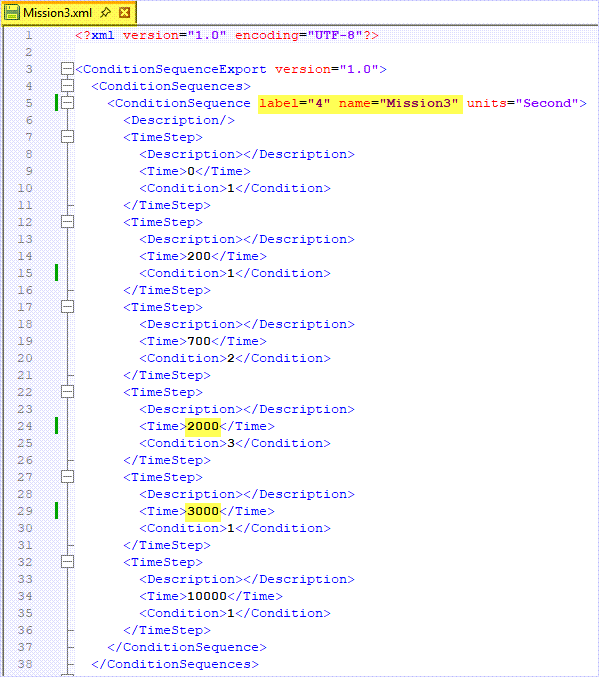
Notice that you changed the imported label to unused label to prevent conflicts and preserve the existing condition sequences.
-
In the Condition Sequence Manager, on the
Condition Sequence tab, click Add new
Condition Sequence From File
 and select
Mission3.xml.
and select
Mission3.xml.
Additional notes
- Reference condition sequence parameter names directly in simulation objects, loads, and constraints by typing the parameter name with the appropriate unit in dialog box.
- If a condition sequence is modified and time steps must be updated, right-click the solution and select Update From Condition Sequence.