Create a solution from a condition sequence

Practice defining parameters, conditions, and a condition sequence, and then create a solution that uses the condition sequence. A condition is a set of numerical values for all the defined parameters. A time history of conditions forms a condition sequence. You can create a solution containing time steps, as appropriate, for the number of sequences in the condition sequence.

Download and extract the part files.

Open the model Simulation file

Open the model Simulation file and reset the dialog box settings.

  1. Choose FileOpen and open turbine_compressor\GasTurbine.Axi_fem1_i_sim1.sim.
  2. Choose FilePreferencesUser Interface and on the Dialog and Precision page, reset the dialog box memory.
  3. Click OK.

Define a parameter, a condition, and a condition sequence

Create a parameter and a condition, and then apply the condition to new time steps of a condition sequence. You will also export the condition sequence.

  1. Choose Home tab→Properties group→Condition Sequences .
  2. In the Parameters tab, observe the existing parameters and click Add new Parameter to create a new parameter.
  3. In the Create Parameter group, set the following options:
    • Parameter Name = P30
    • Measure = Pressure
    • Units = MPa
  4. Click OK.
  5. In the Conditions tab, select Condition 1.
  6. In the Parameters Values for Condition group, click the value cell of P30 and type 0.24637.
  7. Repeat steps 5 and 6 for Condition 2 to set the P30 value to 2.5927.
  8. Right-click Condition 2 and choose Copy.
  9. Select the cloned Condition 2 and rename it to Condition 3.
  10. In the Parameters Values for Condition group, select the value of the following parameters and modify them as follows:
    • NH = 88350.092
    • W30 = 5.654
    • P30 = 1.5927
  11. In the Condition Sequence tab, select Sequence 1 and observe its associated time steps and conditions.
  12. In the Time Steps and Conditions for Sequence group, click Add new Time Step .
  13. In the Create Time Step group, set the following values:
    • Time = 501
    • Condition = 3 - Condition 3
  14. Click OK.
  15. Repeat steps 12 to 14 to add the following time step:
    • Time = 1000
    • Condition = 3 - Condition 3
  16. Click OK twice.
  17. Choose Home tab→Properties group→Condition Sequences .
  18. On the Parameters tab, right-click P30Plot(XY) to observe how this parameter varies with time.
  19. Click OK.
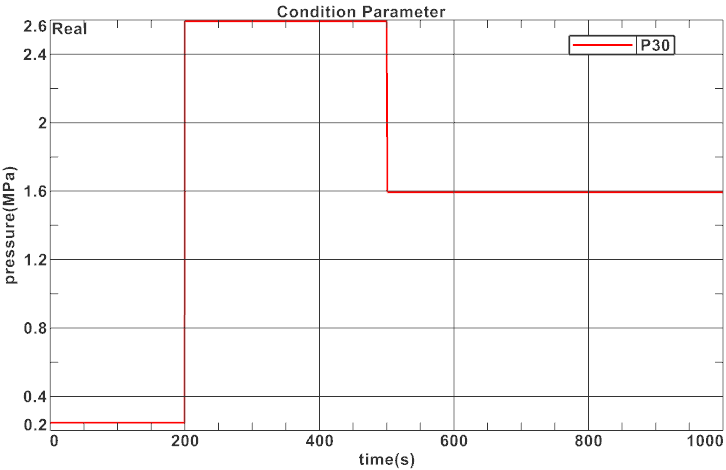
  20. Click Create a New Window to Plot.

  21. Close Graph Window 1.
    Leave the Condition Sequence Manager dialog box opened.

Export condition sequence

Export and share condition sequences in XML or BDD formats.

  1. In the Condition Sequence tab, select the Sequence 1 condition sequence that you want to export.
    You can export and import condition sequences in the XML and BDD file formats.
  2. In the Import / Export group, click Export and browse to a folder.
  3. In the Export Condition Sequence dialog box, from the file type list, choose XML or BDD.
  4. In the File name box, type a name for the exported condition sequence.
  5. Click OK.
    You can now share this condition sequence between models and users. To import a condition sequence to your model, you can use the Import or Add New Condition Sequence From File commands from the Condition Sequence Manager dialog box.
  6. Click OK.

Create a solution from the condition sequence and add the boundary conditions

Create a solution with time steps based on a condition sequence and add boundary conditions.

  1. In the Simulation Navigator, right-click GasTurbineAxi_fem1_i_sim1.sim and select New Solution From Condition Sequence.
  2. In the Solution group, from the Condition Sequence list, select 1 - Sequence 1.
  3. Click Create Solution.
  4. In the Solve Options group, from the Values Outside Time-dependent Tables list, select Periodic so that the solver identifies the table values as periodic, for the times larger than the last table entry. For times smaller than the first table entry, the solver uses the lower bound value.
  5. Click OK.
    Note that the solution time steps are automatically created. However, there is no boundary condition in the solution.
  6. In the Simulation Navigator, expand the Simulation Object Container, Constraint Container, and Load Container nodes.
  7. Select Edge-to-Edge Contact, click and press Ctrl, and select all the existing boundary conditions.
  8. Right-click the selected nodes and choose Add to active solution or step.
    The solution is now ready to solve.
You have completed this lab.