
How to apply element-specific transient temperatures using a TEMPF file?
Learn how to apply element-specific transient temperatures using a TEMPF file instead of a field with time and element ID as independent variables.
A temperature boundary condition can vary with both time and element ID. However, Fields do not support time and element ID as combined independent variables.
To apply different transient temperatures to individual elements, use the From File (TEMPF format) option in the Temperature boundary condition.
TEMPF file format
A TEMPF file defines temperatures for individual elements at specified times.
The file uses the following structure:
- A line beginning with
-99999, followed by the time value. - A series of lines containing the element ID and corresponding temperature.
- The structure repeats for each time step.
For example:
-99999  0.0000000000000000E+00
     1  5.0000000000000000E+01
     2  6.207761680875207E+01
     3  6.231465351620633E+01
     4  6.245670101528796E+01
     5  6.255129887025164E+01
     6  6.228393969353809E+01
     7  6.237404714681011E+01
     8  6.246894825023477E+01
     9  6.255365171132707E+01
    10  6.237075586587480E+01
In this example, the first line specifies the time (0), and the following lines define the temperature of each element at that time.
Generate a sample TEMPF file
To verify the required format, generate a TEMPF file from a simple transient thermal simulation.
- Create a test model with a transient Temperature boundary condition.
- Solve the model to generate the binary TEMPF file in the solution directory.
- Open the MAYA HTT TMG Executive.
-
Set Process Filter to Translation.
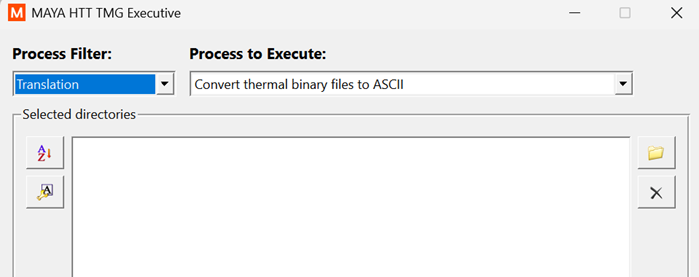
- Set Process to Execute to Convert thermal binary files to ASCII.
- Select the generated TEMPF file and run the conversion.
- Open the converted ASCII file in a text editor to examine its structure.
Create and apply a custom temperature file
- Create an ASCII file containing the element IDs and temperatures for each time step, using the converted TEMPF file as a template.
- Save the file with a name other than
TEMPFto prevent it from being overwritten by the solver. - In Simcenter 3D, create or edit a Temperature boundary condition.
- In the Magnitude group, set Option to From File (TEMPF format).
- Browse to your custom file and select it.
- Solve the model and verify that the temperatures vary correctly with time and element ID.